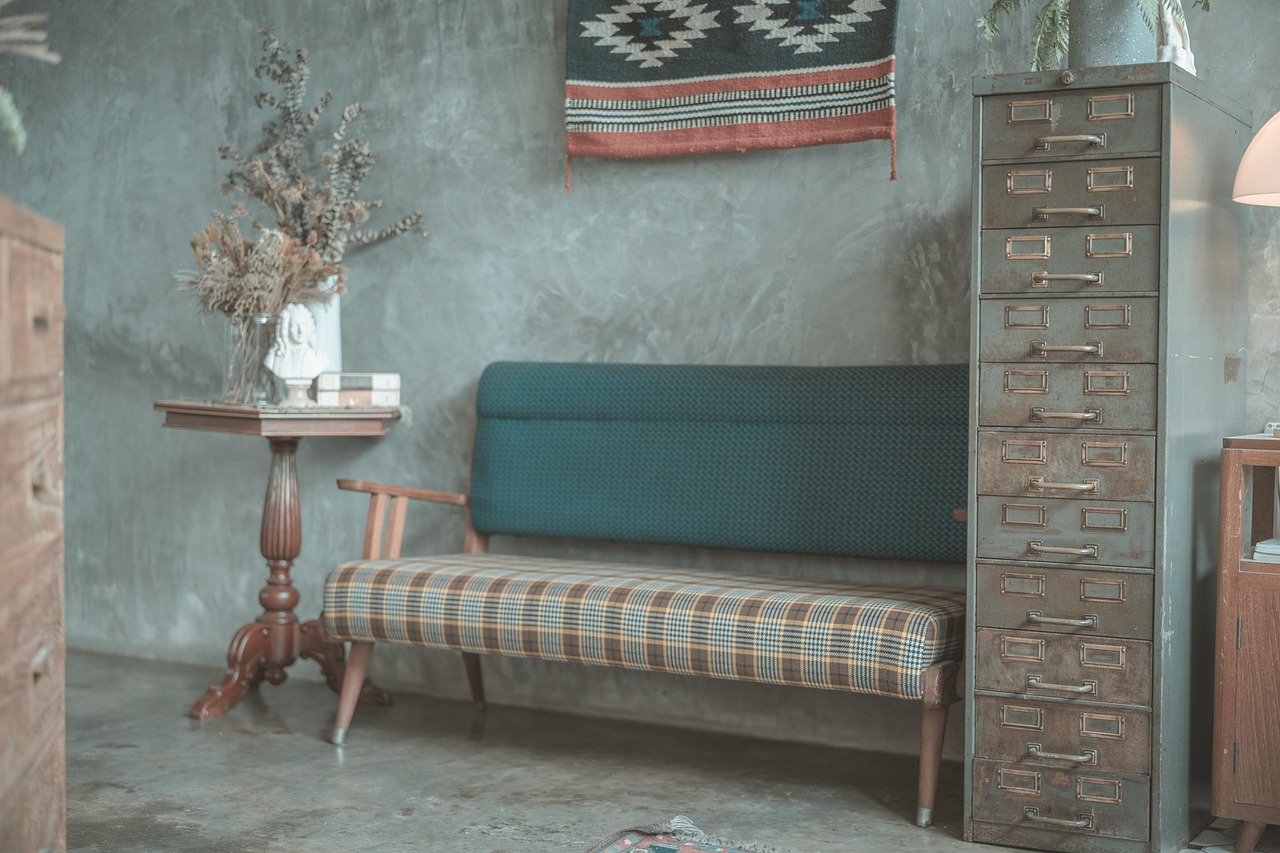
Month: March 2025

Achieving Balance in Open Concept Living: Design Strategies for Functionality and Aesthetics

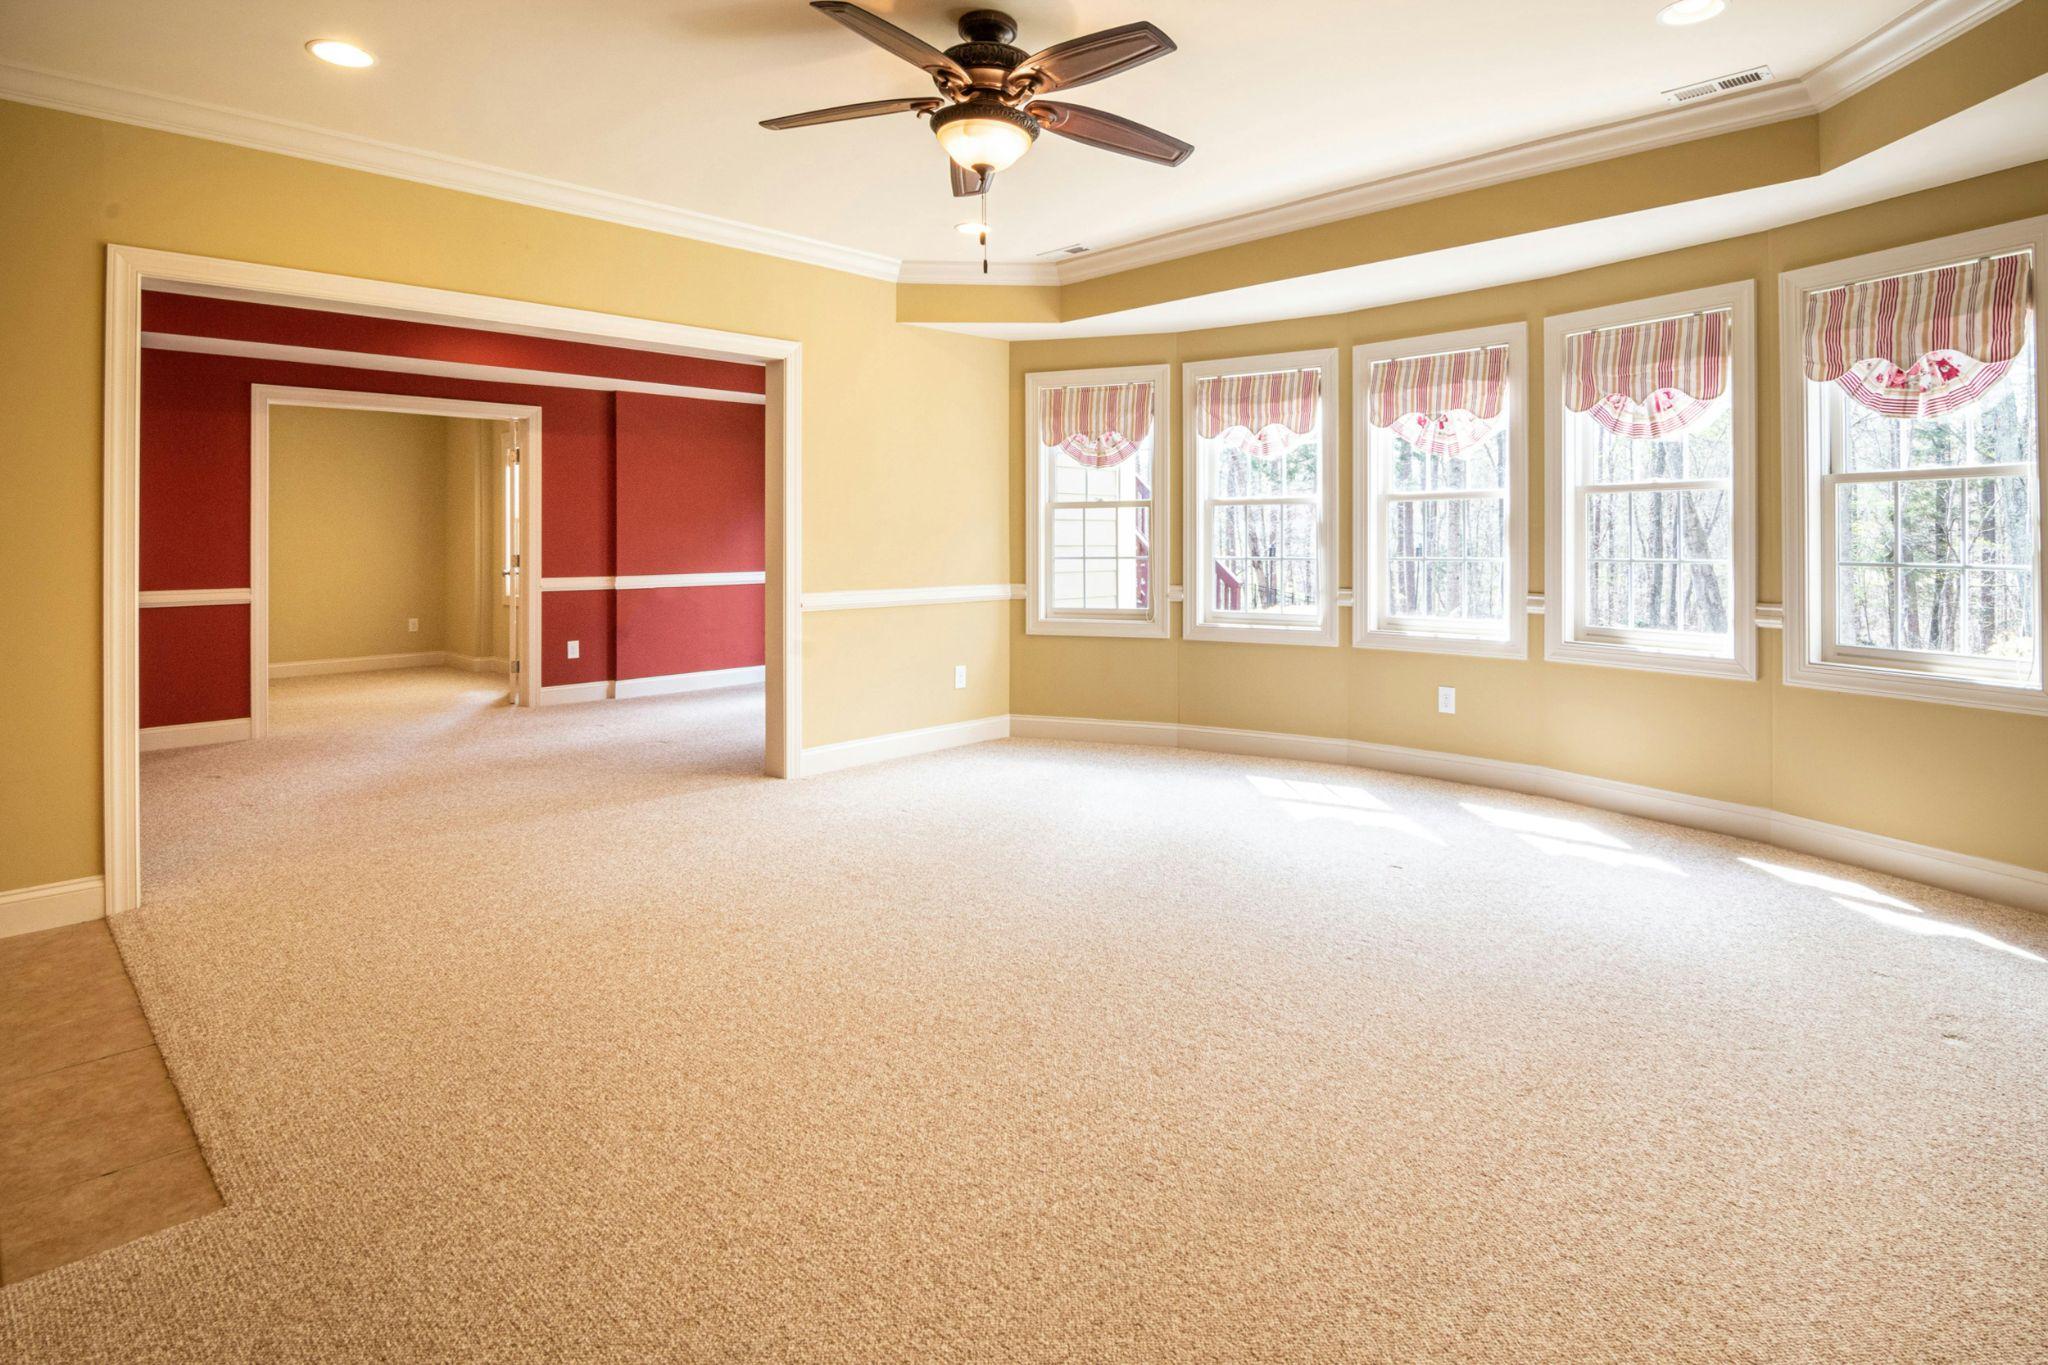
Open concept living spaces continue to dominate modern home design, offering flowing interiors that maximize light, create a sense of spaciousness, and facilitate connection between family members. However, designing these expansive areas presents unique challenges. The key lies in balancing functionality and aesthetics while maintaining distinct zones that serve different purposes. This comprehensive guide explores practical strategies to create harmonious open concept spaces that are both beautiful and livable.

Tips for Achieving Balance in Open Concept Living

Creating a successful open concept space requires thoughtful planning to ensure the area feels cohesive yet clearly defined. A well-designed open floor plan should allow for smooth transitions between zones while maintaining each area’s unique identity and purpose.

Use Multifunctional Furniture

In open concept spaces, multifunctional furniture serves as a cornerstone of efficient design. These versatile pieces maximize utility without cluttering the visual landscape, allowing you to maintain openness while meeting various household needs.

When selecting furniture for open concept areas, prioritize pieces that:

  • Serve multiple functions within your daily routine
  • Provide hidden storage to minimize visual clutter
  • Can be easily reconfigured as needs change
  • Maintain proper scale relative to your space

Recommended Multifunctional Furniture Pieces:

  1. Storage ottomans – Function as coffee tables, extra seating, and hidden storage compartments
  2. Extendable dining tables – Accommodate intimate dinners and larger gatherings without permanently occupying extra space
  3. Sleeper sofas or daybeds – Provide comfortable seating by day and guest accommodations by night
  4. Nesting tables – Offer flexible surface area that can be expanded or compacted as needed
  5. Bookshelf room dividers – Create visual separation while providing display and storage space
  6. Kitchen islands with seating – Combine food preparation areas with casual dining or workspace functions
  7. Flip-top console tables – Serve as slim entryway pieces that expand to dining tables when needed
  8. Storage benches – Provide seating in transitional areas while containing items like shoes or blankets

According to a study by the National Association of Home Builders, 85% of homebuyers now prefer open concept layouts, making efficient furniture selection more important than ever.

Maintain Visual Flow with Consistent Flooring

Continuous flooring creates a seamless visual foundation that unifies distinct functional areas within an open concept space. This continuity helps the eye move naturally throughout the environment, making the space feel more expansive and cohesive.

While transitions between different flooring materials can help define separate zones, these transitions should be intentional and strategic rather than arbitrary. When possible, maintain the same flooring throughout the main living areas to establish a harmonious base for your design.

Comparison of Popular Open Concept Flooring Options:

Flooring Type Pros Cons Best For Maintenance Level
Hardwood Timeless appeal, adds warmth, can be refinished Susceptible to water damage, can scratch, higher cost Living rooms, dining areas, cohesive whole-home solutions Moderate
Engineered Wood More stable than solid hardwood, wider planks available, better moisture resistance Cannot be refinished as many times as solid wood, can still dent Transitional spaces, areas with minor moisture concerns Low-Moderate
Luxury Vinyl Plank (LVP) Waterproof, extremely durable, realistic wood appearance, budget-friendly May not add home value like natural materials, can dent under heavy furniture Kitchens, bathrooms, basements while maintaining wood-look throughout Low
Porcelain Tile Extremely durable, waterproof, available in wood-look styles Cold underfoot, grout requires cleaning, harder surface High-traffic areas, homes in warm climates Low
Natural Stone Unique patterns, high-end appearance, extremely durable Expensive, requires sealing, can be cold underfoot Statement spaces, homes with radiant heating High
Laminate Budget-friendly, resistant to scratches and fading Cannot be refinished, sensitive to moisture, can sound hollow Rental properties, budget renovations Low

When selecting flooring for open concept spaces, consider:

  • The full range of activities that will occur in the space
  • Durability requirements based on foot traffic and lifestyle
  • Maintenance preferences and limitations
  • Sound transmission properties, particularly in two-story spaces
  • Visual warmth and how the flooring affects the room’s acoustics

Add Vertical Elements

Vertical elements create visual boundaries in open layouts without disrupting sightlines or the flow of natural light. These architectural and design features help define different functional zones while preserving the spacious feeling that makes open concept living appealing.

Unlike walls, which completely divide spaces, vertical elements provide psychological separation through visual cues that subtly indicate transitions between different areas. These can range from architectural features to furniture placement.

Effective vertical elements for zone definition include:

  • Partial walls or pony walls – Create definition while maintaining openness
  • Decorative screens or room dividers – Offer flexible, movable separation
  • Ceiling treatments – Use different heights or materials to distinguish zones
  • Lighting fixtures – Hang pendants or chandeliers to anchor specific areas
  • Bookshelves or cabinetry – Provide both separation and functional storage
  • Columns or structural pillars – Leverage existing architectural elements
  • Living walls or large plants – Introduce natural dividers with biophilic benefits
  • Area rugs – While not vertical, they partner with vertical elements to reinforce zone boundaries

When implementing vertical elements, maintain consistent sightlines from most standing positions to preserve the open feel. The goal is to create psychological boundaries rather than physical ones, allowing the space to function as separate rooms while maintaining visual connectivity.

Lighting Strategies for Open Concept Spaces

Lighting design plays a crucial role in open concept living, serving both functional and aesthetic purposes. Well-planned lighting defines zones, creates atmosphere, and enhances the functionality of different areas within the larger space.

Layered Lighting Approach

A layered lighting approach combines multiple light sources at different heights and intensities to create a flexible, dynamic environment. This strategy allows you to adjust the mood and function of various zones throughout the day without compromising the cohesive feel of the space.

The three essential lighting layers include:

  1. Ambient lighting – Provides overall illumination, typically from ceiling fixtures
  2. Task lighting – Focuses light on specific activity areas like cooking or reading
  3. Accent lighting – Highlights architectural features or decorative elements

Lighting Fixture Types and Recommended Placements:

Lighting Layer Fixture Types Ideal Placements Benefits in Open Concept Spaces
Ambient Recessed downlights, Flush mounts, Chandeliers, Cove lighting Evenly spaced across ceilings, Along perimeter soffits Creates consistent base illumination, Unifies the overall space
Task Pendant lights, Under-cabinet lights, Desk lamps, Floor lamps Over islands/dining tables, Under kitchen cabinets, Beside seating areas, Near reading nooks Defines functional zones, Improves usability of specific areas
Accent Wall sconces, Picture lights, LED strips, Track lighting Highlighting art or collections, Washing textured walls, Under floating shelves, Around architectural features Adds dimension, Creates visual interest, Enhances perceived separation of zones

Strategic Light Placement

How and where you position lighting fixtures significantly impacts how people perceive and use different areas within an open concept space. Strategic placement reinforces zone distinctions while maintaining overall harmony.

Best Practices for Light Fixture Placement:

  1. Pendant Lights
    • Hang 30-36 inches above kitchen islands or counters
    • Position 30-36 inches above dining tables
    • Group in odd numbers for visual interest (typically three over an island)
    • Scale size proportionally to the surface below (larger pendants for larger tables)
  2. Recessed Lighting
    • Install in a grid pattern for ambient lighting (typically 4-6 feet apart)
    • Position strategically to highlight architectural features
    • Use wall-washing techniques to make the space feel larger
    • Consider adjustable recessed fixtures to direct light where needed
  3. Floor and Table Lamps
    • Place floor lamps at the corners of seating arrangements
    • Position table lamps at eye level when seated (typically 24-28 inches tall)
    • Use consistent lamp heights within the same zone
    • Select lampshades that complement other lighting elements
  4. Linear Fixtures
    • Install over rectangular tables or kitchen islands
    • Size to approximately 1/2 to 2/3 the length of the surface below
    • Consider the sight lines from different areas when determining hanging height
    • Coordinate finish with other metal elements in the space

Smart Technology Integration

Smart home technology offers powerful solutions for managing open concept spaces more effectively. These systems provide customizable control over environmental factors, helping each zone function optimally while maintaining overall cohesion.

Smart Lighting Systems

Smart lighting transforms how homeowners interact with open concept spaces, allowing for programmable settings that can instantly reconfigure the environment for different activities or times of day.

These systems enable you to:

  • Create pre-set lighting “scenes” for different activities
  • Control multiple fixtures simultaneously
  • Adjust brightness and color temperature to match the time of day
  • Integrate lighting with other smart home elements

Popular Smart Lighting Options:

  1. Philips Hue – Offers extensive color options, third-party integrations, and voice control compatibility
  2. Lutron Caséta – Provides reliable dimming, geofencing capabilities, and doesn’t require neutral wires
  3. LIFX – Features bright bulbs with vibrant colors and no need for a separate hub
  4. Nanoleaf – Specializes in decorative panel systems that serve as both lighting and art
  5. Wiz – Budget-friendly option with robust features and compatibility with multiple voice assistants
  6. C by GE – Simple setup with Bluetooth control and voice assistant integration
  7. Sengled – Offers affordable smart bulbs with extra features like built-in speakers or security cameras

When implementing smart lighting in open concept spaces, consider creating distinct lighting zones that correspond to the functional areas of your space while programming scenes that coordinate these zones for different activities.

Automated Climate Control

Maintaining comfortable temperatures across large, open spaces presents unique challenges due to uneven heating and cooling patterns. Smart thermostats help address these issues through advanced features like zoned temperature control and occupancy sensing.

Smart Thermostat Comparison for Open Concept Homes:

Model Price Range Special Features Zoning Capabilities Voice Control Energy Reports
Ecobee SmartThermostat $$$$ Room sensors, Built-in Alexa Good Alexa, Google, HomeKit Comprehensive
Nest Learning Thermostat $$$$ Auto-scheduling, Farsight detection Moderate Google, Alexa Basic
Honeywell Home T9 $$$ Smart room sensors, Geofencing Excellent Alexa, Google Moderate
Emerson Sensi Touch $$ Geofencing, Remote access Basic Alexa, Google, HomeKit Basic
Mysa Smart Thermostat $$$ Zone control for baseboard heaters Excellent Alexa, Google, HomeKit Comprehensive

For optimal climate control in open concept spaces:

  • Position temperature sensors in each distinct zone
  • Consider supplemental heating or cooling for problem areas
  • Utilize ceiling fans to improve air circulation
  • Program schedules based on actual usage patterns of different zones

Common Mistakes to Avoid

Even thoughtfully designed open concept spaces can fall short if certain common pitfalls aren’t addressed. Recognizing and avoiding these mistakes will help ensure your space achieves both functionality and aesthetic appeal.

Overcrowding the Space

One of the most common errors in open concept design is overcrowding – filling the space with too much furniture or decorative elements. This undermines the primary benefit of open layouts: the sense of spaciousness and flow.

Decluttering Tips for Open Concept Spaces:

  1. Establish a visual edit process – View your space from multiple angles, removing items that disrupt sightlines
  2. Create breathing room around furniture groups – Allow at least 30-36 inches for walkways
  3. Limit large furniture pieces to those that serve essential functions
  4. Choose appropriately scaled items – Avoid oversized furniture in smaller spaces
  5. Implement the “one in, one out” rule for decor and accessories
  6. Create designated “drop zones” for items that typically create clutter
  7. Establish hidden storage systems for seasonal or occasionally used items
  8. Schedule regular decluttering sessions to prevent accumulation

Furniture Layout Suggestions:

  • Float furniture away from walls to create more intimate groupings
  • Use area rugs to anchor furniture arrangements within each zone
  • Position seating to facilitate conversation while maintaining open pathways
  • Ensure that no single piece of furniture dominates the visual field
  • Create clear pathways between functional zones (minimum 36 inches wide)
  • Maintain balanced visual weight throughout the space

Lack of Storage Planning

Without proper storage solutions, open concept living quickly becomes overwhelmed by visual clutter. Since fewer walls mean fewer opportunities for standard storage, creative approaches are essential.

Hidden Storage Solutions for Open Concept Spaces:

  1. Built-in cabinetry that blends with architectural elements
  2. Window seats with lift-up tops or drawers underneath
  3. Hollow ottomans that open for blanket or toy storage
  4. Under-stair storage systems with drawers or cabinets
  5. Platform beds with integrated drawers
  6. Furniture with hidden compartments like storage sofas or coffee tables
  7. Wall-mounted cabinets in dead space areas
  8. Ceiling-mounted storage in garages or utility areas

When planning storage, prioritize frequently used items in easily accessible locations while relegating seasonal or occasional items to less convenient spaces. The goal is to maintain clean, open surfaces that contribute to the spacious feeling while ensuring everything has a designated place.

Conclusion

Creating a balanced open concept living space requires thoughtful attention to both functionality and aesthetics. By incorporating multifunctional furniture, maintaining consistent flooring, adding strategic vertical elements, implementing layered lighting, integrating smart technology, and avoiding common design mistakes, you can create a harmonious environment that serves your needs while looking beautiful.

Remember that successful open concept design is ultimately personal – it should reflect your lifestyle, preferences, and daily routines. Don’t be afraid to experiment with different arrangements and boundaries until you find the perfect balance between openness and definition. The flexibility of these spaces allows them to evolve with your needs over time, making them adaptable to life’s changing demands.

With careful planning and these strategic approaches, your open concept space can achieve that elusive balance: a home that feels both spacious and intimate, minimalist and functional, unified and clearly defined.

DIY Backyard Projects to Transform Your Outdoor Space

Transform your ordinary backyard into an extraordinary outdoor sanctuary with these creative DIY backyard projects. Whether you have a spacious yard or a compact outdoor area, these projects will help you maximize your space while adding functionality, beauty, and personal flair. From cozy seating arrangements to vertical gardens, lighting solutions, and decorative accents, these ideas will inspire you to roll up your sleeves and create the backyard oasis you’ve always dreamed of.

Create a Cozy Seating Area

The heart of any outdoor living space is a comfortable seating area where you can relax, entertain, and enjoy the fresh air. Creating dedicated zones for seating can transform how you use your backyard and extend your living space beyond the walls of your home.

Build a Fire Pit with Seating

A fire pit creates an instant gathering spot in your backyard, providing warmth, light, and a focal point for entertaining. Building your own fire pit is simpler than you might think and can save you hundreds of dollars compared to pre-made options.

Materials Needed:

  • Concrete retaining wall blocks (50-60 blocks for a typical 3-foot diameter pit)
  • Masonry adhesive
  • Gravel (approximately 4-5 bags)
  • Sand (1-2 bags)
  • Level
  • Measuring tape
  • Spray paint for marking
  • Shovel
  • Tamper
  • Metal fire pit ring (optional but recommended)

Step-by-Step Guide:

  1. Choose your location – Select a flat area at least 10-15 feet away from structures, overhanging trees, or flammable materials.
  2. Mark the area – Use spray paint to mark a circle where your fire pit will go. A diameter of 3-4 feet works well for most backyards.
  3. Excavate – Dig about 6-8 inches deep within your marked circle.
  4. Add drainage materials – Fill the bottom 2-3 inches with gravel for drainage.
  5. Add sand – Layer 1-2 inches of sand on top of the gravel and level it.
  6. Build the first layer – Place the first ring of blocks around the perimeter, making sure they’re level.
  7. Continue building – Add subsequent layers, staggering the joints between blocks and using masonry adhesive between layers for stability.
  8. Install fire ring – If using a metal fire ring, place it inside your block structure.

For seating, consider creating a ring of built-in benches around your fire pit or arranging weather-resistant chairs or benches to create a conversation area. Adirondack chairs, concrete blocks with cushions, or repurposed wooden logs can all serve as stylish, budget-friendly seating options.

According to a study by the American Society of Landscape Architects, fire pits consistently rank as one of the most popular outdoor design elements, with over 65% of homeowners prioritizing them in backyard renovations.

Install a Porch Swing

A porch swing offers a touch of nostalgic charm while providing a peaceful spot to relax with a book or enjoy morning coffee. While traditionally mounted on porches, these swings can be installed in various backyard locations.

Materials:

  • Pre-made swing or swing kit
  • Weather-resistant lumber (if building from scratch)
  • Heavy-duty hanging chain or rope
  • Ceiling hooks or hanging hardware rated for at least 500 pounds
  • Drill
  • Stud finder
  • Level
  • Measuring tape
  • Paint or stain
  • Cushions

Installation Instructions:

  1. Select your swing – Choose a pre-made swing or build one using weather-resistant wood like cedar or cypress.
  2. Choose the location – Find a sturdy overhead support, such as a pergola, strong tree branch, or dedicated swing frame.
  3. Mark mounting points – Ensure mounting points are level and properly spaced to match your swing width.
  4. Install mounting hardware – Secure heavy-duty hooks or eyebolts into ceiling joists or beams.
  5. Hang the chains – Attach chains or ropes to your mounting hardware.
  6. Mount the swing – Connect the swing to the chains and adjust the height so it sits 17-19 inches off the ground.
  7. Test for safety – Before full use, test the swing to ensure it supports weight properly.

Safety Tips:

  • Weight capacity – Ensure all hardware is rated for at least 500 pounds.
  • Regular inspection – Check chains, ropes, and mounting hardware regularly for wear or damage.
  • Weather protection – Use weather-resistant materials and consider covering or storing the swing during harsh weather.
  • Proper mounting – Always mount into structural supports, never into just drywall or unsupported boards.

Enhance Your Garden with Vertical Elements

When horizontal space is limited, think vertically! Vertical gardening not only maximizes your planting area but also creates visual interest, improves privacy, and can even help cool your outdoor space.

Construct a Vertical Garden

Vertical gardens allow you to grow plants in even the smallest outdoor spaces. They’re perfect for herbs, succulents, small vegetables, and flowering plants.

Materials:

  • Wooden pallets, trellis panels, or purpose-built vertical planters
  • Landscape fabric
  • Staple gun and staples
  • Potting soil
  • Plants
  • Screws or mounting hardware
  • Drill
  • Plant watering system (optional)

Construction Steps:

  1. Prepare your structure – If using a pallet, sand rough edges and consider painting or staining it.
  2. Add backing – Line the back and sides with landscape fabric to contain soil, stapling it in place.
  3. Mount your structure – Secure your vertical garden to a wall, fence, or support structure.
  4. Add soil – Fill pockets or compartments with quality potting soil.
  5. Plant your selections – Insert plants, starting from the bottom and working up.
  6. Install irrigation – Consider adding a drip irrigation system for easier watering.

Best Plants for Vertical Gardens:

Plant Type Benefits Care Level
Herbs (Basil, Thyme, Rosemary) Edible, aromatic, practical Easy
Succulents Drought-tolerant, low maintenance Very Easy
Ferns Add texture, shade-tolerant Moderate
Strawberries Produce fruit, trailing habit Moderate
Lettuce and Greens Edible, quick growing Easy
Petunias and Calibrachoa Colorful flowers, trailing habit Easy
Air Plants No soil needed, unique appearance Easy

Maintenance Tips:

  • Water more frequently than ground plants, as vertical gardens dry out faster
  • Fertilize regularly with a diluted liquid fertilizer
  • Replace plants as needed to maintain appearance
  • Check for pests regularly, as infestations can spread quickly in close plantings

Build an Herb Spiral

An herb spiral is an ingenious garden design that creates multiple microclimates in a small space, allowing you to grow a variety of herbs with different needs in one compact area.

Materials:

  • Bricks, stones, or concrete blocks (approximately 100-200 depending on size)
  • Compost and potting soil
  • Gravel for drainage
  • Various herbs
  • Measuring tape
  • Garden hose or rope (for marking)

Construction Steps:

  1. Mark the footprint – Use a garden hose or rope to create a spiral shape, starting with a circle about 5-6 feet in diameter.
  2. Create foundation – Remove grass/weeds and add a layer of gravel for drainage.
  3. Build the walls – Starting from the outside, build the spiral walls with your chosen material, gradually increasing height toward the center (up to about 3 feet tall).
  4. Add soil – Fill with soil mixture, creating a slope from top to bottom.
  5. Plant herbs – Plant drought-tolerant herbs at the top (rosemary, thyme, sage) and moisture-loving herbs at the bottom (mint, parsley).

An herb spiral typically creates at least three distinct planting zones:

  • Top zone – Sunny, well-drained, perfect for Mediterranean herbs
  • Middle zone – Semi-moist, good for herbs like oregano and chives
  • Bottom zone – Shadier and moister, ideal for mint, cilantro, and parsley

Add Ambiance with Lighting

Outdoor lighting extends the usability of your backyard into the evening hours while creating a magical atmosphere. Strategic lighting transforms your garden from a daytime-only space into a 24-hour retreat.

Hang String Lights

String lights (also called fairy lights or bistro lights) create an instant festive atmosphere and provide gentle illumination for evening gatherings.

Hanging Techniques:

  1. Zigzag pattern – Run lights back and forth across a space, secured to sturdy points.
  2. Perimeter lighting – Run lights around the edge of a patio, deck, or pergola.
  3. Canopy effect – Create a “ceiling” of lights above a seating area.
  4. Tree wrapping – Wind lights around tree trunks and branches.

Materials:

  • Outdoor-rated string lights
  • Eye hooks, cup hooks, or guide wire
  • Extension cords (outdoor-rated)
  • Cable ties or garden wire
  • Timer or smart plug (optional)
  • Drill
  • Ladder

Safety Considerations:

  • Use only outdoor-rated lights and extension cords
  • Keep connections off the ground and protected from moisture
  • Secure wires to avoid trip hazards
  • Consider using low-voltage systems for added safety
  • Install a GFCI outlet if you don’t already have one outdoors

Install Solar-Powered Path Lights

Solar path lights enhance safety by illuminating walkways while adding charming visual elements to your landscape. They’re eco-friendly and eliminate the need for electrical wiring.

Installation Process:

  1. Map out placement – Space lights 6-8 feet apart along pathways or garden borders.
  2. Remove stakes – Take apart lights if necessary.
  3. Insert stakes – Push stakes firmly into the ground.
  4. Attach lights – Connect light fixtures to stakes.
  5. Allow for charging – Give lights a full day of sun before expecting maximum performance.

Comparison of Solar Light Options:

Type Brightness Battery Life Durability Price Range Best For
Basic Stake Lights Low-Medium 6-8 hours Moderate $2-5 each Basic path marking
Premium Stake Lights Medium-High 8-12 hours Good $10-20 each Garden accents
Spotlight High 6-10 hours Very Good $20-40 each Highlighting features
Motion-Sensor Lights Very High 4-6 hours (when activated) Good $15-30 each Security areas
String Solar Lights Low 6-8 hours Moderate $15-25 set Decorative accents
Solar Lanterns Medium 6-8 hours Good $15-40 each Tables, hanging

Pro Tips:

  • Position solar panels to receive maximum sunlight
  • Clean panels occasionally to maintain efficiency
  • Consider removing and storing premium lights during winter in harsh climates
  • Look for lights with replaceable batteries to extend lifespan

Incorporate Functional Structures

Adding architectural elements to your backyard not only enhances its appearance but also increases functionality, providing shade, storage, and defined spaces for different activities.

Build a Pergola

A pergola creates an outdoor room, defining space while providing filtered shade and a structure for climbing plants. It’s the perfect framework for creating an outdoor dining or lounging area.

Materials:

  • Pressure-treated lumber or cedar (posts, beams, rafters)
  • Concrete
  • Gravel
  • Post hole digger or power auger
  • Level
  • Drill and bits
  • Screws and bolts
  • Measuring tape
  • Saw
  • Optional shade cloth or retractable canopy

Basic Construction Steps:

  1. Plan your design – Determine size and height (typically 8-10 feet tall).
  2. Mark post locations – Typically 4 posts in a rectangle 8-12 feet apart.
  3. Dig post holes – Create holes 1/3 the height of your posts, about 10-12 inches in diameter.
  4. Set posts – Place posts in holes, add gravel for drainage, fill with concrete, and ensure they’re plumb.
  5. Attach support beams – Once concrete cures, attach horizontal beams to connect posts.
  6. Add cross beams – Install rafters perpendicular to support beams.
  7. Add finishing touches – Consider lattice sides, climbing plants, or a retractable canopy.

Design Options:

  • Attached pergola – Connected to your house on one side
  • Freestanding pergola – Placed anywhere in your yard
  • Arched top – Adds architectural interest
  • Louvered roof – Adjustable slats for variable shade

Create a Garden Shed

A garden shed provides essential storage while adding character to your landscape. Building your own allows you to customize the size, style, and features to perfectly suit your needs.

Materials:

  • Pressure-treated lumber for framing
  • Plywood for flooring and roof sheathing
  • Siding (T1-11, board and batten, or vinyl)
  • Roofing materials (shingles, metal, or corrugated panels)
  • Door(s) and hardware
  • Windows (optional)
  • Nails and screws
  • Foundation materials (concrete blocks, gravel, or poured slab)

Basic Construction Process:

  1. Prepare the site – Clear, level, and create a foundation.
  2. Build the floor frame – Construct using pressure-treated 2×6 or 2×8 lumber.
  3. Add flooring – Attach 3/4″ pressure-treated plywood.
  4. Frame the walls – Construct wall frames on the ground, then raise them.
  5. Install roof trusses – Add pre-built or site-built roof support.
  6. Add sheathing and roofing – Cover roof framework with plywood, then add roofing material.
  7. Attach siding – Cover exterior walls.
  8. Install door and windows – Add entries and natural light sources.
  9. Finish interior – Add shelving, hooks, and organization systems.

Customization Ideas:

  • Potting bench – Include a built-in workspace for garden projects
  • Tool organization – Install pegboard walls or specialized storage
  • Solar power – Add a small panel for lighting
  • Living roof – Create a green roof planted with sedums
  • Rainwater collection – Integrate gutters and a rain barrel
  • Dutch door – Install a split door for ventilation while keeping animals out

Personalize with Decorative Accents

The finishing touches you add to your backyard make it uniquely yours. Decorative elements express your personality and transform functional spaces into memorable outdoor environments.

Paint a Mural or Install Art

Outdoor art installations bring color, personality, and focal points to your garden. They can disguise unattractive features, enhance themes, and provide joy year-round.

Mural Ideas:

  • Trompe l’oeil – Create the illusion of a window, door, or extended garden
  • Abstract designs – Add color and movement with non-representational patterns
  • Nature scenes – Extend your garden with painted flowers, landscapes, or wildlife
  • Geometric patterns – Create modern, clean designs with shapes and bold colors

Materials for Outdoor Art:

  • Exterior-grade paints
  • Marine-grade varnish or sealer
  • Weather-resistant materials (metal, stone, treated wood, ceramic)
  • UV-resistant coatings

Weatherproofing Tips:

  • Use quality exterior paints designed to withstand sun and moisture
  • Apply multiple protective clear coats over artwork
  • Create proper drainage for three-dimensional pieces
  • Consider seasonal storage for valuable or delicate items
  • Install art slightly elevated from the ground to prevent water damage

DIY Outdoor Furniture

Custom-built outdoor furniture allows you to create pieces perfectly sized for your space while saving money and expressing your creativity.

Simple Pallet Bench Project:

Materials:

  • 2-3 wooden pallets
  • Sandpaper (60, 120, and 220 grit)
  • Exterior wood stain or paint
  • Polyurethane sealer
  • Screws
  • Drill
  • Saw
  • Cushions or outdoor fabric

Construction Steps:

  1. Disassemble or cut pallets as needed for your design
  2. Sand thoroughly to remove splinters and rough edges
  3. Construct bench frame using the sturdiest pallet pieces
  4. Add seat and backrest using remaining boards
  5. Sand again for a smooth finish
  6. Stain or paint in your desired color
  7. Seal thoroughly with exterior-grade polyurethane
  8. Add cushions made from outdoor fabric

Other DIY Furniture Ideas:

  • Concrete block and wood bench – Alternate cinder blocks and treated lumber for an industrial-modern look
  • Adirondack chairs – Classic, comfortable seating with plans widely available online
  • Outdoor dining table – Build from reclaimed wood for a rustic farmhouse feel
  • Sectional seating – Create modular pieces that can be rearranged as needed
  • Hanging daybed – Suspended platform bed for ultimate relaxation

Conclusion

Transforming your backyard doesn’t require a professional landscaper or an enormous budget. With these DIY backyard projects, you can gradually create an outdoor space that reflects your personality and meets your needs for relaxation, entertainment, and connection with nature.

Start with smaller projects like installing path lights or building a vertical garden, then work your way up to larger undertakings like pergolas or fire pits. Each completed project will build your confidence and skills while enhancing your outdoor living experience.

Remember that your backyard is an extension of your home and a reflection of your lifestyle. By investing time in these DIY projects, you’re creating not just a beautiful space, but also a setting for memories with family and friends for years to come.

[Top]