Putting together a gamer room setup is rarely about one magic purchase. More often, it’s the small, slightly boring choices – screen height, chair position, lighting, where cables are routed – that end up deciding whether the space feels great or quietly drives you crazy.
Whether you’ve got a dedicated gaming room or just a corner in a bedroom, the same idea applies: the room should be comfortable for long sessions, easy to keep tidy, and calm enough that you can actually focus when things get intense. The good part is that most improvements can be done in stages. A weekend is enough to make a noticeable difference, even on a tight budget.
Define your gaming room goal
Before furniture gets moved, it helps to decide what the room is supposed to do. A setup built for competitive shooters is often arranged differently than a cozy console corner, and a streaming space brings its own constraints (camera angles, background, and sound).
- Competitive PC gaming: prioritize monitor position, stable desk space, and distraction control.
- Console gaming: prioritize viewing distance, seating comfort, and simple access to controllers and charging.
- Streaming/recording: prioritize lighting on your face, a clean background, and microphone placement.
- Work + play in one room: prioritize quick “mode switching” so the space doesn’t feel chaotic.
A simple rule that tends to work: pick your top three priorities and let them guide everything else. If you try to optimize for every possible scenario, the room usually ends up feeling busy and compromised.
Layout and placement
Layout is often treated as an afterthought, but it’s the foundation. It’s easier to manage cables, lighting, and storage when the desk and screens are placed sensibly from the start.
Start with constraints: window glare, door swing, outlet locations, and any furniture that can’t be moved. In most rooms, a desk is best placed so the monitor isn’t facing a window directly. Putting the desk perpendicular to the window is usually the least annoying option.
- Keep a clear chair path: you should be able to roll back without hitting the bed or wall instantly.
- Leave breathing room around the PC/console so heat isn’t trapped in a tight corner.
- Place frequently used items (headset, controller, water bottle) within easy reach.
- For small rooms, a corner desk can make the space feel more usable than a long desk on a narrow wall.
If you share the room (or you simply hate visual clutter), it’s worth planning where cables will run early. Tripping hazards are usually created when power strips are left on the floor and wires are allowed to sprawl.
Ergonomics: desk, chair, and monitor height
This is the part people know they should do, and then skip until neck pain shows up. Ergonomics doesn’t have to be perfect. It just needs to be “good enough” so your body isn’t fighting the setup.
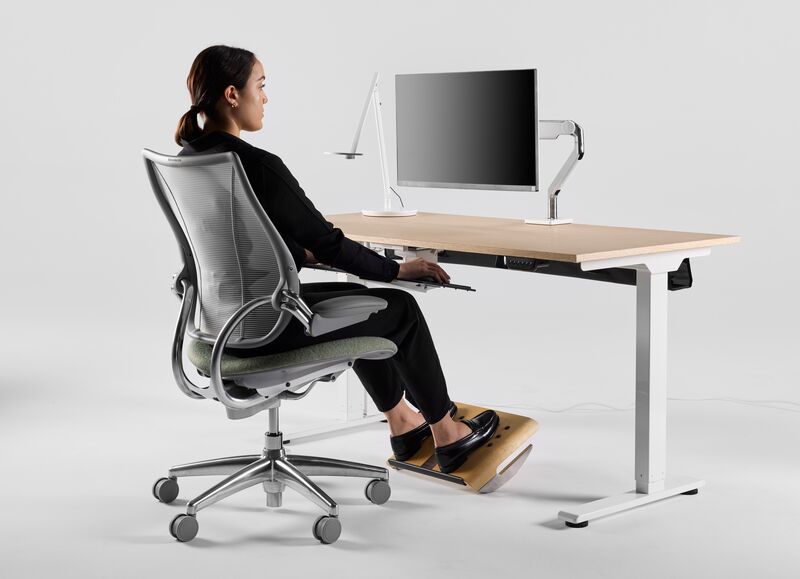
A few practical checkpoints that tend to help:
- Feet: flat on the floor (or on a footrest), with thighs roughly parallel to the ground.
- Arms: elbows near 90 degrees when hands are on keyboard/mouse; shoulders should not be shrugged.
- Back: lower back supported; if your chair has adjustable lumbar support, it’s worth using.
- Wrists: neutral position; avoid bending wrists upward for long periods.
Monitor placement is simple but frequently misjudged: the top of the screen should be at, or slightly below, eye level when you sit upright. Distance is usually about an arm’s length for typical 24-27 inch monitors, though it’s adjusted by comfort more than by strict math.
If your desk height is fixed and doesn’t fit you well, small workarounds often help more than people expect – a seat cushion, a footrest, or a monitor riser can be enough to get into a healthier posture.
Monitors and TV positioning
PC gamers tend to sit much closer to their screens than console gamers, so positioning is handled differently. For desk monitors, a monitor arm is often the easiest upgrade: desk space is freed up, and height/angle adjustments become painless.
- For a single monitor: keep it centered; your nose should point roughly at the middle of the screen.
- For two monitors: keep your main screen centered and angle the secondary monitor inward.
- For ultrawide screens: sit a little farther back than you would with a standard display to reduce eye scanning fatigue.
For a TV setup, wall mounting is worth considering if you play for long sessions. A TV mounted too high (the classic “near-ceiling” look) is fine for quick videos, but it’s uncomfortable for hours of gaming. Usually, the center of the screen is best kept close to seated eye level.
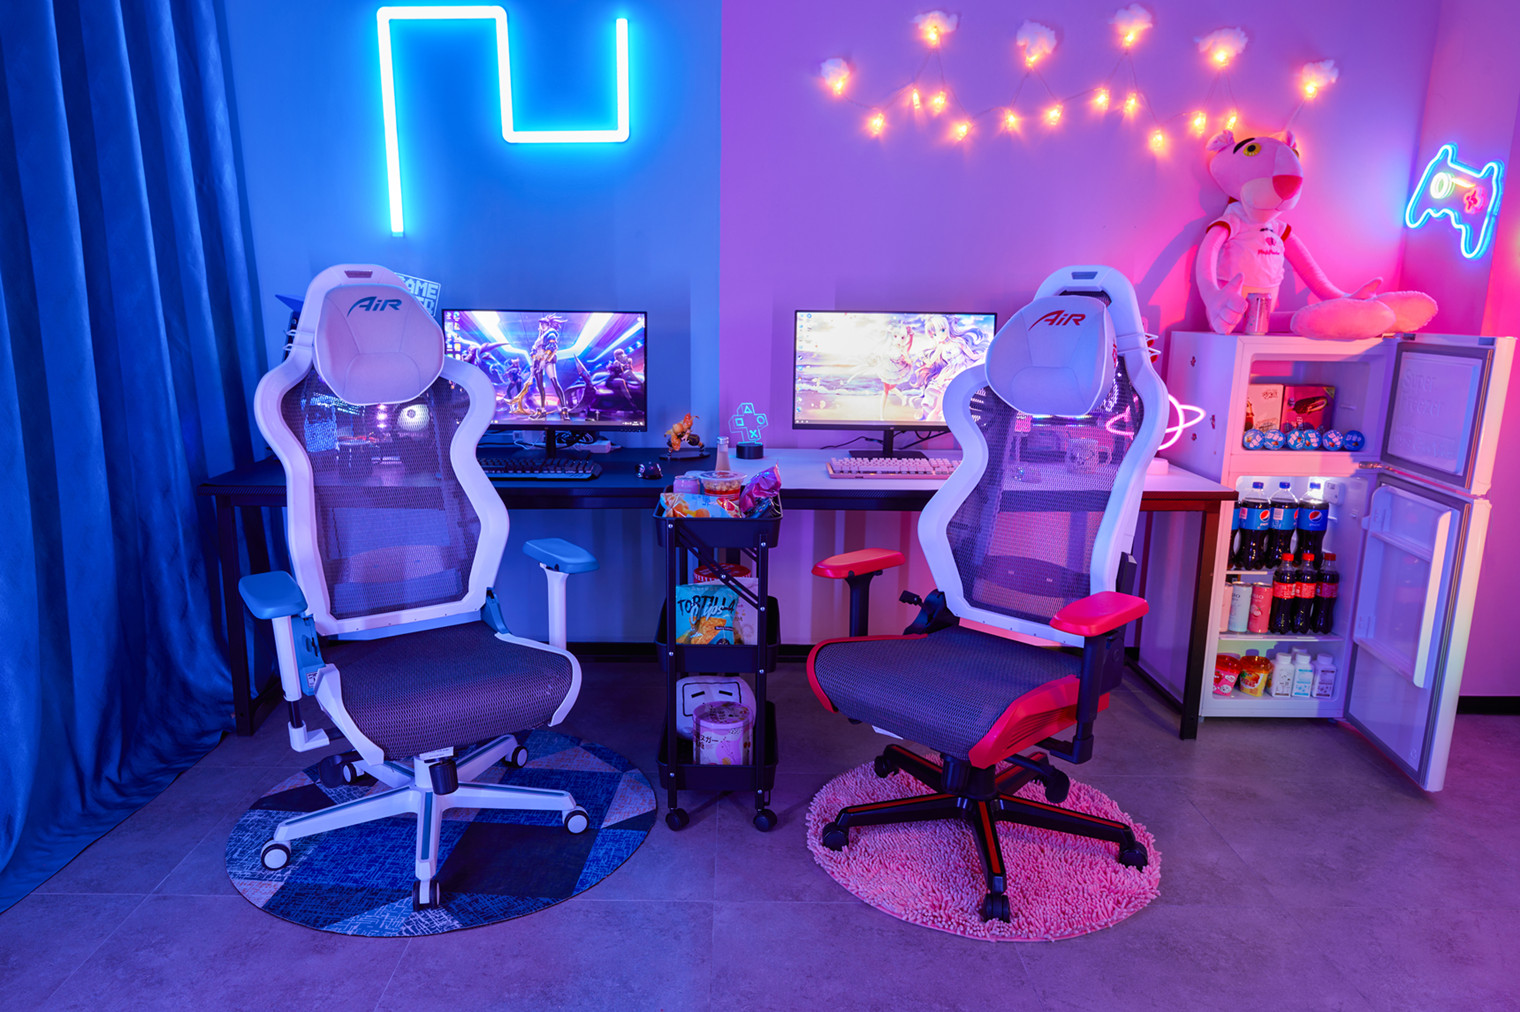
Lighting: finding the right balance
Lighting is one of those “invisible upgrades.” When it’s done well, you stop thinking about it – your eyes feel better, the room feels calmer, and the setup looks cleaner in photos.
Layered lighting tends to work best: a general room light, a focused task light when needed, and softer accent lighting for atmosphere. Also, it’s worth avoiding a pitch-black room with only a bright monitor. Eye strain is often created that way.
Table: Lighting options (pros, cons, best use)
|
Lighting type |
Pros |
Cons |
Best use |
|
Ambient (ceiling/floor lamp) |
Keeps the room usable; reduces harsh contrast |
Can cause screen glare if poorly placed |
General room lighting; ideally dimmable |
|
Task (desk lamp) |
Helps for keyboard notes, building, work |
Can be distracting if too bright |
Work or hobbies at the desk; aim away from the screen |
|
Bias lighting (behind monitor/TV) |
Often reduces eye fatigue; improves perceived contrast |
Can distract if animated or too bright |
Soft neutral glow behind screens |
|
RGB/accent lighting |
Adds atmosphere; easy to personalize |
Easy to overdo; can feel chaotic |
Shelves, under-desk, wall accents; keep subtle |
Bias lighting is usually the most practical lighting trick. A simple LED strip behind the monitor creates a soft halo and makes night sessions feel less harsh. If you’re streaming, a basic key light at about 45 degrees from your face is often enough – it doesn’t need to look like a film set.
RGB looks best when it supports the room rather than competes with it. In practice, one or two accent areas is plenty.
Cable management: taming the chaos
Cable management isn’t glamorous, which is exactly why it’s skipped. But once the cables are under control, the whole setup looks more intentional, cleaning becomes easier, and accidental unplugging happens less.
Table: Cable management toolkit
|
Tool / method |
Where it’s used |
Quick tip |
|
Velcro cable ties |
Bundling cables behind the desk |
Reusable; leave slack so devices can be moved |
|
Cable clips |
Desk edge/legs, monitor arm, wall routes |
Use multiple sizes; group by destination |
|
Under-desk cable tray |
Hiding power strip and excess length |
Keeps the floor clear; makes vacuuming easy |
|
Cable sleeve |
Desk-to-PC bundle |
Zipper sleeves are easier than wrap styles |
|
Cable raceway/channel |
Along walls or desk underside |
Adhesive-backed channels keep cables from sagging |
|
Mounted power strip |
Under desk or behind a leg |
Mount it so the switch is reachable but not visible |
30-minute upgrade checklist:
- Unplug and untangle. It’s faster than trying to “fix” a tangled mess while everything is live.
- Group cables by destination (monitors together, peripherals together, power together).
- Bundle each group with Velcro ties and keep a little slack for adjustments.
- Mount the power strip under the desk or behind a leg to get it off the floor.
- Route bundles along the desk edge/leg using clips or a channel.
- Coil excess length in the cable tray (or a box) instead of leaving loops on the floor.
- Plug everything back in and test. Labeling cables is optional, but it saves time later.
It’s easy to forget, but dust builds up where cables pile up. When cables are lifted off the floor, the room stays cleaner with less effort.
Audio and simple acoustics
Audio is where immersion lives. It also determines how well you can communicate, especially in team games. Most rooms won’t need studio-grade treatment, but a few changes can make the sound feel less harsh and echo-y.
- Headphones: great for late nights, shared living spaces, and positional cues in competitive games.
- Speakers: better for casual sessions and shared play, but they need reasonable placement to sound clear.
If speakers are used, they’re best placed roughly at ear height and angled slightly toward your head (a simple triangle). Many desk speakers sit too low by default, so small stands or pads are often used to lift them.
For echo, the simplest “treatment” is soft stuff: rugs, curtains, upholstered furniture, even a bookshelf full of uneven surfaces. It’s not glamorous, but it works – and it looks normal, which is the point.
For a microphone, a boom arm is often used so the mic can sit close without cluttering the desk. A pop filter helps, and the mic is typically placed slightly off-center rather than directly in front of the mouth.
Ventilation and temperature
Heat is produced by gaming gear whether you notice it or not. In a small room, it adds up fast. And once you’re uncomfortable, focus tends to drop – it’s hard to play well when you’re sweating or freezing.
- Give your PC clearance. A tower pushed against a wall or trapped in a tight cubby runs hotter.
- Use a fan to move hot air out (toward a window/doorway) rather than just stirring warm air around.
- Keep intakes clean. Dust filters work only when they’re actually cleaned occasionally.
- If the room is cold, warm hands matter. A small heater can help, but keep it away from cables and the PC.
Airflow is often more important than chasing a perfect temperature number. If the air feels stale, you’ll notice it long before a thermometer does.
Storage and organization
Clutter doesn’t just look messy; it quietly steals attention. When everything has a place, the desk stays clear and the room feels calmer.
- Use a headset hook or stand. It’s a small change, but it keeps the desk surface usable.
- Controller charging: pick a single spot (dock or shelf) so controllers aren’t hunted down.
- Keep rarely used items (extra cables, manuals, spare parts) in one labeled box or drawer.
- For PCs on carpet, a small stand or board helps reduce dust intake and improves stability.
If you collect physical games or gear, it helps to choose: display it intentionally, or store it cleanly. The half-display, half-hidden pile is what makes rooms feel chaotic.
Style and aesthetics: simple rules that work
A good-looking setup is rarely complicated. It’s usually consistent. Even an inexpensive room can look clean when a few visual rules are followed.
- Limit your palette: two or three base colors plus one accent is often enough.
- Match finishes when possible (black peripherals with a black desk, for example).
- Keep the desktop surface mostly clear; display items belong on shelves, not under your hands.
- Hide cables if you can – or route them neatly so they look intentional.
If you’re planning to stream, the background is worth thinking about. A simple shelf with a plant or a few well-placed items tends to look better than a wall covered in random stuff.
Budget tiers: what to prioritize at each level
Budgets change what’s possible, but priorities stay mostly the same. Ergonomics and lighting usually produce the biggest comfort improvements per dollar.
Table: Budget tiers (what to buy/do and expected impact)
|
Tier |
Key upgrades |
Impact |
|
Budget ($50-200) |
Used ergonomic office chair; bias lighting strip; basic cable kit; better mousepad |
Medium |
|
Comfort ($200-600) |
Quality chair; monitor arm; improved task + ambient lighting; small storage solutions; rug/curtains for acoustics |
High |
|
Premium ($600-1500+) |
Adjustable desk; high-end chair; multi-monitor arms; custom lighting; improved climate control; modular storage |
Medium-High |
A common mistake is spending heavily on aesthetics while the chair and monitor height are still wrong. In practice, a comfortable posture and decent lighting make the room feel premium even if the gear isn’t.
Small room layout ideas
Small rooms aren’t hopeless – they just require a little more intention. Vertical storage and wall-mounted solutions are often used because floor space is the real bottleneck.
Table: Small room layouts (who they’re for)
|
Layout style |
Space needed |
Who it’s for |
|
Corner desk setup |
One corner (about 4×4 ft / 1.2×1.2 m) |
PC gamers who need desk space but still want the room to function as a bedroom |
|
Wall-mounted monitor + minimal desk |
A narrow wall section (3-4 ft / 0.9-1.2 m) |
Very small rooms; people who want a clean, minimalist setup |
|
Console + TV opposite seating |
TV wall + 6-10 ft (1.8-3 m) viewing distance |
Console players who use the bedroom as an entertainment space too |
|
L-shaped desk in a corner |
Larger corner (about 5×5 ft / 1.5×1.5 m) |
Work + gaming setups; multi-monitor users who need separation |
If the room is shared with sleep, it helps to keep the gaming mess visually contained. A pegboard, a couple of shelves, and a drawer unit often do more than people expect.
One-day step-by-step plan
If you’re redoing the space, a full day is usually enough – but only if you don’t keep stopping to hunt for missing clips, screws, or extension cords. Having the basic supplies ready makes the day feel a lot less chaotic.
Morning (setup and positioning):
- Clear the area and clean first (dust, vacuum). It’s much easier before cables return.
- Place desk and seating; check chair clearance and walking paths.
- Set monitor/TV height and distance; rough-adjust angles.
Afternoon (cables and lighting):
- Route and bundle cables; mount the power strip; hide excess length.
- Install bias lighting behind the monitor/TV.
- Add task and ambient lighting; reduce glare spots.
Evening (finishing touches and testing):
- Add storage hooks/shelves for headset/controllers.
- Set up audio and mic position; test voice chat levels.
- Do a final pass: sit down, play for 15 minutes, and adjust anything that feels off.
FAQ
Do I really need a second monitor?
Not always. It’s useful for Discord, music, guides, or streaming controls, but it also eats desk space. If your desk is small, a single well-positioned monitor often feels better.
Should I prioritize a chair or a desk upgrade first?
Usually the chair. A decent chair fixes comfort quickly, while a mediocre desk can be worked around with small adjustments.
Is RGB lighting helpful or just decoration?
Mostly decoration. Bias lighting behind the monitor is the one lighting trick that’s often helpful for eye comfort; RGB is best used as a subtle accent.
How can echo be reduced without remodeling?
Soft materials. A rug, curtains, and a few fabric surfaces can reduce reflections noticeably. You don’t need to cover every wall.
What’s the most overlooked cheap upgrade?
Monitor height and cable cleanup. When the screen sits at a better height and the floor is clear, the setup suddenly feels calmer and more deliberate.
Conclusion
A gamer room setup doesn’t have to be expensive, and it doesn’t have to be perfect. It just needs to support how you actually play. If comfort and focus are handled first – chair, screen height, and lighting – everything else becomes easier to build on.
Pick one improvement you can do today (bias lighting, monitor height, or cable routing) and commit to it. Those small fixes compound, and the room starts to feel like it was designed on purpose – because it was.